Monday, December 26, 2011

Calendar Easel Card

Today I wanted to post this cute little calendar easel card, which makes a great gift right here as the new year approaches! The little calendar is from vippies.com. For my calendar I decorated it with the Gently Falling Stamp set and the fun greetings set Friendly Phrases. The designer paper is from my scraps, so I don't remember what the name of it is, sorry.

                            Stamps: Gently Falling, Friendly Phrases 
                            Paper: Cajun Craze, Early Espresso, Very Vanilla, unknown DSP 
                            Ink: Cajun Craze, Chocolate Chip, Early Espresso 
                            Accessories: Calendar from Vippies, Dimensionals, Glue dots, paper snips
                            Techniques: Rock & Roll, 2-step stamping, hand cutting 

Here’s how to make the calendar:

1. Start with a 3½” x 8½” piece of cardstock. Insert it in your Simply Scored board so that its 8 ½” side is along the top of the board, and score it at 2-1/8” and 4-1/4”.

2. Fold both score lines the same direction. Decorate the 2-1/8” panel at the end, and attach the calendar so that it is across the first fold.


3. Make a panel or punch to use for the inside of the card, and attach it to the lower half of the inside of the card using Dimensionals. This will work as a place for the top half of the card to catch, creating your easel.

All items that I used to make this card (except the calendars) are available from Stampin’ Up! The Gently Falling stamp set is only available in the Holiday Mini Catalog which lasts through January 3rd, so don’t miss out! If you would like to purchase any of the items shown here, please visit my business website at http://www.trina_kuriger.stampinup.net/

Tuesday, December 20, 2011

My Christmas Cards for 2011

Here are the Christmas cards that I used this year. Since it has been a tough year, several of them a CASEd from other stampers, and I will try to give credit where appropriate. Enough with the disclaimers already, on with the cards!

This card was inspired by one that I saw in Stampin' Success Magazine, but I changed the image and the greeting. This a "cheater" out-of-the-box technique card, because I just stamped the image once on the oval and a second time on a separate sheet of WW cardstock, colored it, and then cut out leaves and berries and attached them with glue dots so that they hung outside the oval.
Stamps- Beautiful Season, Teeny Tiny Wishes; Paper - Riding Hood Red, Early Espresso, Whisper White, Letters to Santa DP; Ink: -Black Stazon, Riding Hood Red, Old Olive, Basic Gray, So Saffron;  Accessories - Decorative Label Punch, Riding Hood Red Taffeta from Mistletoe Originals ribbon pack, Self adhesive pearls, Red sharpie to color pearls;  Techniques - Center Step, Watercoloring with Blender Pens, Out of the Box Technique, coloring pearls with sharpie markers 
This card was designed by my friend and fellow demonstrator, Lynn Anderson. The glitter on the roof and porch railings is Dazzling Details. I thought she did a beautiful job and had to remake it myself!
Stamps: Christmas Lodge 
Paper: Cherry Cobbler, Whisper White, Basic Black, Frostwood Lodge DP 
Ink: Black Stazon 
Accessories: Cherry Cobbler Quilted Ribbon, Dazzling Details 


Here are a couple of tips on how I made this card. I made the "mat" for the oval using eight flowers from the Blossom Bouquet punch. To get red rhinestones, I colored them with a red Sharpie before I put them on the image.
Stamps: Easy Events 
Paper: Real Red, Lucky Limeade DP, Very Vanilla 
Ink: Basic Black, Lucky Limeade 
Accessories: Real Red 5/8" Satin ribbon, Victoria Crochet Trim, Ovals Die, Blossom Bouquet punch, Basic Rhinestones, Red Sharpie, Blender Pen
Techniques: Coloring with Blender Pen, Coloring Rhinestones 

I CASED this from someone but I don't know who because I just saw it and then later did it from memory. I didn't make a lot of changes, except to make it an A2 size. The Medallion is stamped in Old Olive Craft Ink and embossed with Iridescent Ice embossing powder. The "merry" that has been punched out is from the Pennant Parade stamp set. 
Stamps: Medallion, Pennant Parade 
Paper: Whisper White 
Ink: Old Olive Classic and Craft inks 
Accessories: Old Olive Satin Ribbon, Jewelry Tag punch, Vintage Trinkets, Iridescent Ice Embossing Powder 


I CASEd this card from Mary Fish. This version is very similar to hers, I just used the Postage Stamp Punch, changed the sentiment and used Silver Glimmer paper instead of the cardstock she had used for the scalloped edge. The front panel is popped up on Dimensionals to give the card a shadowbox effect.  
Stamps: Jolly Bingo Bits, Heard From the Heart 
Paper: Whisper White, Silver Glimmer Paper 
Ink: Cherry Cobbler 
Accessories: Scallop Edge Punch, Postage Stamp Punch, Cherry Cobbler Seam Binding, Dimensionals


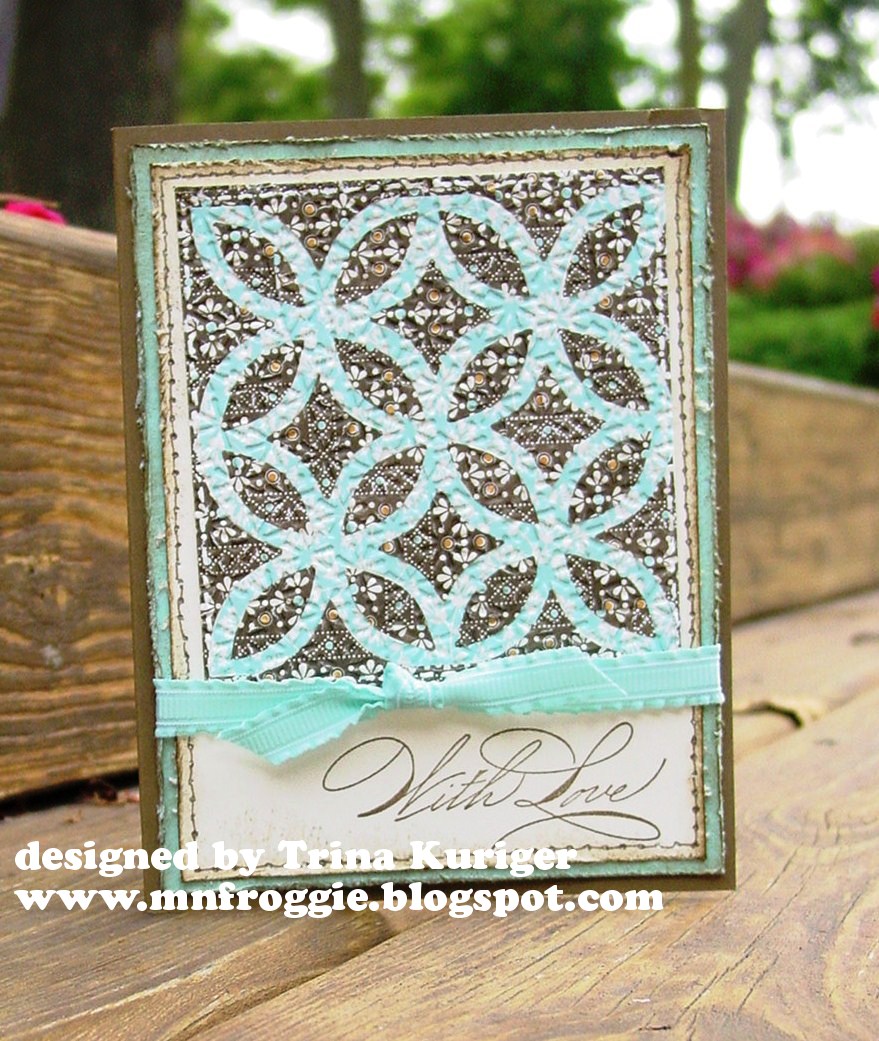
I did a card very similar to this one about two years ago in Old Olive. I love the look of masking and sponging so much I thought it was time to revisit it! TFL!
Stamps: Lovely as a Tree 
Paper: Marina Mist, Whisper White 
Ink: Marina Mist 
Accessories: Marina Mist Scalloped Dotted Ribbon, Snowburst Embossing folder, Northern Frost die, Self-adhesive Rhinestones, Post-it Notes, Oval die (to cut post it notes), sponge 
Techniques: Masking, Sponging 


Stamps: Dasher, Serene Snowflakes, Four the Season 
Paper: Night of Navy, Brushed Gold 
Ink: Versamark 
Accessories: Gold Embossing powder 
Techniques: Heat Embossing 


Stamps: Pines and Poinsettias 
Paper: Real Red, Wild Wasabi, Holly Berry Bouquet DSP 
Ink: Chocolate Chip, Wild Wasabi, Cherry Cobbler 
Accessories: Snow Burst embossing folder, 1-3/4" circle punch. 2-3/8" scallop circle punch, 2-1/2" circle punch, scallop trim border punch, riding hood red 3/8' taffeta ribbon 

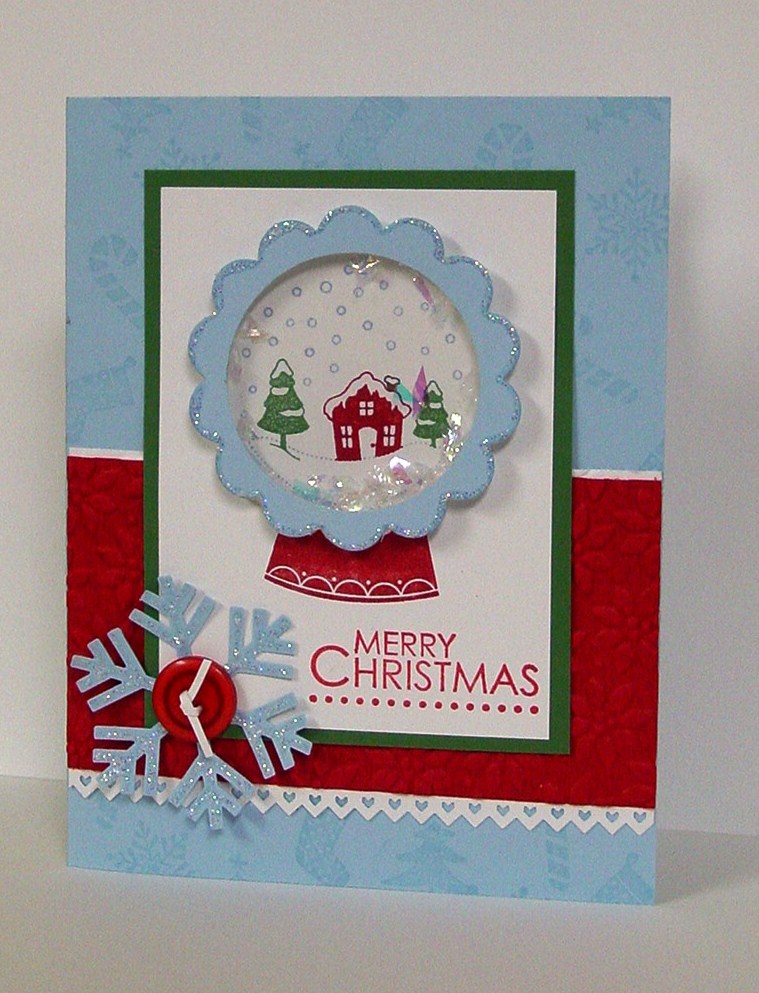
I wanted to make a shaker frames card with the Sweet Snowglobe stamp, and found an adorable one made by Minders on Splitcoast Stampers. I just changed the background stamp, embossing folder, border punch and the greeting. Also I added a snowflake and a button! 
Stamps: Sweet Snowglobe, Jolly Bingo Bits, Season of Joy 
Paper: Whisper White, Bashful Blue, Read Red, Garden Green 
Ink: Bashful Blue, Read Red, Garden Green, Versamark 
Accessories: Snowflake Punch, Window sheets, 1-3/4" circle punch, 2-3/8" scallop circle punch, mica flakes, Brights Buttons (Real Red), Pretty Petals Embossing folder, Dazzling Details, Pinking Hearts Border Punch, glue dots and multipurpose liquid glue 
Techniques: Marker to stamp, Watermarking, shaker frame 


All items that I used to make this card are available from Stampin’ Up! The Christmas Lodge and Pines & Poinsettias stamp sets, Holly Berry Bouquet and Frostwood Lodge Designer Papers, Dazzling Details, Mica Flakes and Silver Glimmer Paper are only available in the Holiday Mini Catalog which lasts through January 3rd, so don’t miss out! If you would like to purchase any of the items shown here, please visit my business website at http://www.trina_kuriger.stampinup.net/

Sunday, December 4, 2011

Lace Rosette Christmas Card


Well, here I am finally back with a card for you. This card is very similar to one in the November issue of the SU demonstrator’s magazine, Stampin’ Success. I just changed the color scheme, greeting and embellishments slightly to have it just the way I like it. I found that a lot of stampers had questions about how to make the rosette, so I am going to do a photo tutorial showing you what worked for me.

Before I start the tutorial, I will go over the basics for the rest of the card. I started with a 3-7/8” x 5-1/8” piece of Crumb Cake Cardstock, and I stamped the greeting from Hand-Penned Holidays in Island Indigo Classic Ink. Then I rubbed it with an Embossing Buddy and I stamped the snowflake (from Serene Snowflakes) in Versamark all over the Crumb Cake piece, but trying not to cover the greeting. I then used white embossing powder and heat embossed the snowflakes. I adhered this Crumb Cake piece to a 4x5¼” piece of Whisper White Cardstock. Then I added the ribbons. There are actually three pieces of ribbon on this card. First I adhered two pieces of Island Indigo Ruffled ribbon around the cardstock, overlapping them about half way. This made them wide enough that they looked pretty topped with a piece of Whisper White 3/8” Taffeta Ribbon. I used Sticky Strip on the back of the cardstock to adhere the ribbon, because I think it needs a strong adhesive to hold all this ribbon.  Then I adhered the entire panel to an Island Indigo card base. After that all that is left is to explain how I made the lace rosette.


Lace Rosette Tutorial
1.Start with a 1”x6¼” of Whisper White cardstock.


2.Use your Simply Scored score board to score it at ½” intervals (1/2”, 1”, 1½”, 2”, 2½”, etc).


3. Turn the cardstock over and score at the ¼” and ¾” marks, all along the cardstock. You will end up with a score line between each of the marks you made in step 2. You must score before you punch!


4. Punch the scored cardstock with the Lace Ribbon Border punch. This size cardstock is too small to show all of the detail of the punch, as you see in the example, one side is cut flat instead of having the curved edge.


5.Fold the cardstock back and forth along the score lines. Use a bone folder to get a good crease.


6. Apply a small amount of Tombow Mulitpurpose Liquid glue to the last ¼” piece of the lace, and glue that to the first ¼” so that you create a ring.


7. Clip the two ends together and leave them to dry for a few minutes.


8.(Optional)Apply a little Tombow Mulitpurpose Liquid glue in random areas around the outside of the cardstock, then sprinkle on Dazzling Diamonds. Leave it to dry for a few minutes.


9.Punch a 2-3/8” scalloped circle out of Island Indigo cardstock.


10. Apply a puddle about the size of a dime of Crystal Effects to the center of the scalloped circle.


11. Put your Lace Rosette ring on the scalloped circle, so that the curved edges are down and the flat side is up.


12. Gather the top into the center and press down to flatten the white cardstock.


13.  Press the gathered center into the crystal effects and make sure it is lying neatly (not too neatly, don’t make yourself frustrated over this, because you will be covering the center up eventually).


14.Put something on top of the rosette to hold it in place while it dries. You want something heavy enough to hold it but not heavy enough to smash it flat. I used a button container. Leave it to dry at least  ½ hour, possibly longer depending on your climate.


15. Use a scrap of Whisper White cardstock and punch it once with the Scalloped Lace Border punch. Cut out one of the center flower elements to use on top of your rosette. You can either cut this out by hand, or punch it out with a ¾” circle punch. If you use the circle punch you may have to clean up any messy edges by hand.


16. Apply a little Tombow Mulitpurpose Liquid glue to the back of the flower element and glue it down on top of the rosette.


17. Cover the hole of the flower element with one of the largest sized Basic Rhinestones.


18. Adhere to your card with Dimensionals.


That’s all there is to it. I hope you enjoyed today’s tutorial!


All items that I used to make this card are available from Stampin’ Up! The Hand-Penned Holiday stamp set is only available through January 3rd, so don’t miss out! If you would like to purchase any of the items shown here, please visit my business website at http://www.trina_kuriger.stampinup.net/

Saturday, December 3, 2011

I'll be posting again soon

Hi everyone, sorry for my long absence. My mother died recently of metastatic breast cancer. I took a few weeks away from everything to take care of her at the end, and after that I just didn’t have the energy to do anything extra. Honestly, stamping has been a little hard for me, since it was something my mom and I always did together. But I am feeling ready to start blogging again and I have some things in mind to post. I’ll be back tomorrow with a tutorial and hopefully after that I will be posting regularly again.


Happy Stamping!


Trina

Wednesday, August 31, 2011

"The Open Sea" Trifold Shutter card – Goodbye to a great stamp set!

Hi everyone! Today, August 31st, is the last day to order from Stampin’ Up!’s Summer Mini Catalog.  There are some great sets there that you are not going to want to miss. My card for today highlights my absolute favorite set from this catalog, The Open Sea. Here it is both open and closed, so you can see all the details. 


I made this card using all the stamps from The Open Sea, and the great designer paper pack Nautical Expedition.  I am really going to miss both of these! I also used Cherry Cobbler textured cardstock, Early Espresso, Not Quite Navy and Very Vanilla cardstocks. The inks I used were Crumb Cake, Early Espresso and Not Quite Navy classic ink. I also sponged a lot using the Early Espresso ink.

Here are the cutting and scoring directions for making a Trifold Shutter card.
1. Start with a 5 ½” x 12" piece of cardstock. Line up the long edge at the 1 ½” mark and cut between 2” and 10”. Repeat on the other long side.

2. Put your card stock into your score board so that the long end is across the top of the board. At 4” and 8” score all the way across. Then at 2” and 10” score from the top edge down 1.5” to the cut line.  Turn the cardstock so that the opposite side is at the tops and then score in 1.5” at 2” and 10”on that side.

3. Fold cardstock away from you at 2”. Then at 4” fold the top and bottom toward you and the middle section away from you. At 8” fold the top and bottom away from you and the middle section toward you. At 10” fold the cardstock toward you.
4. Embellish as desired.


Thanks for reading my blog! Happy stamping!

All items that I used to make this card are available from Stampin’ Up!. The The Open Sea stamp set and Nautical Expedition Designer Series paper both are only available for one more day, so don’t miss out! If you would like to purchase any of the items shown here, please visit my business website at http://www.trina_kuriger.stampinup.net/

Sunday, August 28, 2011

Gently Falling Card and a Leaf Sponging Tutorial

Here’s another card that I made for a Splitcoast Stampers’ Virtual Stamp Night challenge. This one is for the challenge to use twine on your card.

                             Stamps: Gently Falling 
                      Paper: Confetti White, Early Espresso, Spice Cake DSP 
                      Ink: Crumb Cake, Early Espresso, Daffodil Delight, Pumpkin Pie, Cajun Craze
                                 and Cherry Cobbler 
                     Accessories: Hemp Twine, Sponge Daubers, Paper Snips, Dimensionals, Glue
                                 dots 
                     Techniques: Sponging, Cutting 

This card uses Stampin’ Up!’s new Gently Falling stamp set. It’s in the new Holiday Mini Catalog and available starting September 1st. At the end of this post, I have a photo tutorial showing you how to use sponge daubers and Classic Ink to get these beautiful fall leaves. The other details on the card are as follows. The base is Confetti White cardstock; I love how the little flecks of color in the Confetti White cardstock add to the natural look of the card! There is a 1½” x 4¼” strip of Spice Cake Designer Paper across the bottom of the card, and a 24” piece of Hemp Twine is wrapped twice around the card base and tied off with a knot.  I stamped leaf images in Crumb Cake on a 2½” x 3¾” piece of Confetti White cardstock and matted that on a piece of 2-5/8” x 3-7/8” base of Early Espresso cardstock.  I attached that to the card with Dimensionals. Then I made the leaves as described below and used a glue dot to attach them to the card, this allows them to curl up a bit and look more natural. Here are the directions for the leaves


Leaf Sponging Tutorial

First off, I would like to say that this is just one way to sponge these leaves. There are an infinite number of variations and that makes it possible to have each leaf look unique! I am going to show you how I did it, but play around with it and find out what are your favorite color combinations and patterns.

1. I stamped leaves on Very Vanilla cardstock using Early Espresso ink. Then I cut out each leaf using paper snips. When you cut out images to use as embellishments on cards, you should cut along the outside of the image, not right at the stamped line.  See my cut outs below.


2.  I sponged these leaves using Sponge Daubers and Daffodil Delight, Pumpkin Pie, Cajun Craze and Cherry Cobbler Classic Inks.


3. First I used a dauber to apply Daffodil Delight Ink to the center of all three leaves.


4. Then I added Pumpkin Pie ink outside of the Daffodil Delight ink. It is best if you rub the dauber lightly over your ink pad and then touch it lightly to your leaf. This will help you avoid getting streaky, splotchy areas and give you a more natural look. I sponged the stem of the smallest leaf (I think it’s a birch leaf) with Pumpkin Pie.


5. Next, I added Cajun Craze around the Pumpkin Pie ink.  I sponged the stems of the maple and oak leaves with Cajun Craze.

For the smaller two leaves (oak and birch), I took this color all the way to the edge. I actually picked up the leaf and rubbed the dauber along the edges of the leaves to make the color darker there.


6. I sponged a little Cherry Cobbler ink on the tips of the maple leaf to give it some fiery red color. I also added a little of the Cherry Cobbler ink to the stem and rubbed the dauber along the edges of the leaves to make the color darker there.


7. I attached the finished leaves to my card using one glue dot in the center so that the edges could curl up.


Thanks for reading my blog! I hope you enjoyed my leaf sponging tutorial. I would love to hear what you think, so please leave a comment.


All items that I used to make this card are available from Stampin’ Up!. The Spice Cake Designer Series Paper and Gently Falling stamp set are all sneak peak items and won’t be available until next week (Sept 1st). If you would like to purchase any of the items shown here, please visit my business website at www.trina_kuriger.stampinup.net 


Saturday, August 27, 2011

Hand-Penned Holidays and a Spice Cake Quilt

Hi everyone! Here is the card I have for you today. I made it for one of the Virtual Stamp Night challenges this weekend at Splitcoast Stampers.
Stamps: Hand Penned Holidays 
Paper: Spice Cake DSP, Soft Suede, Pool Party, Very Vanilla 
Ink: Soft Suede 
Accessories: Bigz Lattice Die, Pool Party 3/8" Ruffled Ribbon,  Snow Burst Embossing Folder, Glue stick, Sponge, Mat Pack and Piercing tool, Soft Suede Marker, Signo White Gel Pen, Cutter Kit
Techniques: Embedded Embossing, Faux Stitching, Distressing, Sponging 


I made this quilt using the new Spice Cake Designer Paper and the Embedded Embossing technique. This paper is in SU!’s new holiday mini, and is available to order starting September 1st, only 6 days away! The card base is Soft Suede, and then there is a 4” x 5¼” mat of Pool Party cardstock and a 3¾” x 5” mat of Very Vanilla cardstock. I distressed the edges of both mats using the Cutter Kit and sponged them both with Soft Suede Classic Ink.  On the Very Vanilla base I added an outline of Faux Stitching using the Mat Pack and Paper Piercer Tool and a Soft Suede marker.  The sentiment – With Love – is stamped in Soft Suede. It is from the new Hand-Penned Holidays set, which is also in the new Holiday Mini Catalog. The ribbon is Pool Party 3/8” Ruffled Ribbon.  Around the quilt I made another row of Faux Stitching using the Signo white gel pen, but it doesn’t really show much. 


And here is how I made the embedded embossing quilt.

1.  I cut a piece of two different designer papers down to 3 ¾” x 3 ¾”. For this card I used one pattern that was mostly Pool Party and another that was mostly Soft Suede. Then I ran them through the Big Shot using the Lattice Bigz Die.

2. I covered a 3 ¾” x 3 ¾” piece of Vary Vanilla cardstock with glue stick. Then I laid down the Pool Party colored Lattice cut out.

3. I used the Soft Suede piece of designer paper for all the other parts of the cut out (the areas between the lattice and the part surrounding it) and placed them on the same glue stick covered cardstock.

4. Then I put the cardstock with the assembled, glued on pieces in the Snow Burst Embossing Folder and ran it through the Big Shot to give it the textured look. You can do this with any of SU!’s highly detailed embossing folders.

5. Attach the finished product to the card with Sticky Strip or Multipurpose Liquid Glue.


Thanks for reading my blog! I hope you enjoyed today’s post. I love comments, so please leave one!

All items that I used to make this card are available from Stampin’ Up. The Spice Cake Designer Series Paper, Snow Burst Embossing Folder and Hand-Penned Holidays stamp set are all sneak peak items and won’t be available until next week (Sept 1st). If you would like to purchase any of the items shown here, please visit my business website at www.trina_kuriger.stampinup.net

Saturday, August 20, 2011

Colored Rhinestones and Fringed Ribbon – Tutorials

I am going to revisit this card I showed you yesterday because I want to explain a couple of the little techniques I used on it.

To see a detailed explanation of how I made the central image, please visit yesterday’s blog post
This post will cover how I made the fringed ribbon and colored rhinestones.  Rhinestones first (they are easiestJ) and then below that I will cover the ribbon.


Tutorial for Coloring Rhinestones
1.  Stampin’ Up!’s Basic Jewel Rhinestones can be colored easily using Sharpie markers. For this card I used a brown marker. Fine Point (the larger ones) works best.

2. While the rhinestones are still on their original sheet, color all over the outside of them. They take on the color easily, just scribble across the top and sides. It is best if you do this before you add them to the project so that you don’t get Sharpie ink on your cardstock.

3. They will dry very quickly, almost instantly and are ready to transfer to your project.


Tutorial for making Fringed Ribbon
1. I like to do this to the wide striped grosgrain ribbon, when I need to create a ribbon that is narrower. For this card I used the 1 ¼” Cajun Craze Striped Grosgrain. Cut a piece of ribbon to the desired length, and then cut along the stripe to get a straight line. If your line is not perfect, it will not show, as long as it is almost straight.
2. If you want fringe on both sides, cut along the stripe on the other side.
3. Tease out the strands of the ribbon that go down the length of the ribbon, and once you can grasp them, pull them off the length of the ribbon completely.
4. You will be left with a ribbon that has fringe along the side like this. I always do this planning to make the fringe where the white stripe was. If you make fringe where the colored stripe was, you will pull out all the color because the colored strings in the ribbon only run the length of the ribbon and the strands underneath them are white.
5. Repeat step 3 on the other side if you have cut the ribbon on both sides.
Once you have created the fringed ribbon, attach it to the card. If you are tucking the ends under your project, you do not need to do anything more. But if you are tying a knot so that the ends of the ribbon will show, those ends will fray. To make this look right on your project, you either need to singe the ribbon to hold it intact, or fray it intentionally.
To singe it
6. Trim the end of the ribbon straight.
7. Pull out one thread from the end. This will leave a little fringe behind
8. Heat only the very end of the ribbon to melt the little fringe on the end. This takes a few tries to get it right, so I suggest you practice it before you do it on the final project.
An easier option is to just go ahead and fray the ends of the ribbon.
9. To do that simple tease the treads going the length of the ribbon apart.
10. Continue to do that down to the knot and remove all the loose cross threads.
11. Your finished project will look like this.

Thanks for reading my blog. I love comments, so please leave one if you enjoyed this post!

All products used here are available from Stampin’ Up! I you would like to purchase these, or any other Stampin’ Up! products, please visit my business website at http://www.trina_kuriger.stampinup.net/